
So, you want to know how to learn Excel VBA (Visual Basic for Applications). Good for you. This post will guide you through your first encounter and get you started on the right track.
Note that routines written in VBA are often simply referred to as ‘macros’.
This is a great pity as macros have a great deal to offer.
You may be wondering ‘How long will it take for me to learn how to write macros?’
Well, with the aid of this post, you will be writing simple routines within half an hour. How long it takes to learn how to write more sophisticated routines will depend upon how much time and effort you wish to devote to the learning process.
As with many subjects, you will learn a great deal in the initial phase and your skills will visibly improve from week to week. Keep in mind that there is no finish line to cross – your learning will continue as long as you keep coding, albeit at a slower rate.
My understanding of Excel macros was initially gained through trial and error – and there were many pitfalls for an unwary beginner. By reading this post, and applying what you have read, I hope that you will avoid the pitfalls that awaited me!
1 What is a macro?
OK, before we move on to the actual mechanics of writing our own macros we should really understand what we mean when say ‘macro’.
We use macros to either achieve results that cannot be achieved with Excel alone or to automate tasks that we routinely undertake in Excel.
For example, a task that requires 4 hours of user input every week could be automated so that a simple click of a button achieves the same result in 5 minutes – imagine the saved time over the course of a year!
2 Using the VBE – your coding workplace
The actual writing of your macros will take place in the Visual Basic Editor (VBE).
You can access the VBE from Excel by navigating to the Developer item on the main menu and then selecting the Visual Basic menu item (see Fig1a).
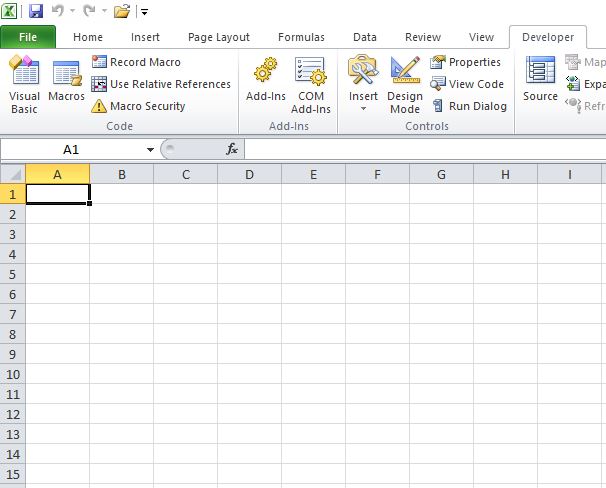
If you can’t see the Developer item on the main menu then you will need to add it by selecting it from the Customize Ribbon menu (see Fig1b). Alternatively, you can simply press the Alt & F11 keys together.

(In older versions of Excel you can select the Macro item in the Tools menu and then the Visual Basic Editor).
Once you have accessed the VBE you will be presented with a screen similar to the one shown in Fig2 below. Do not be put off by its appearance – it really is quite straightforward.
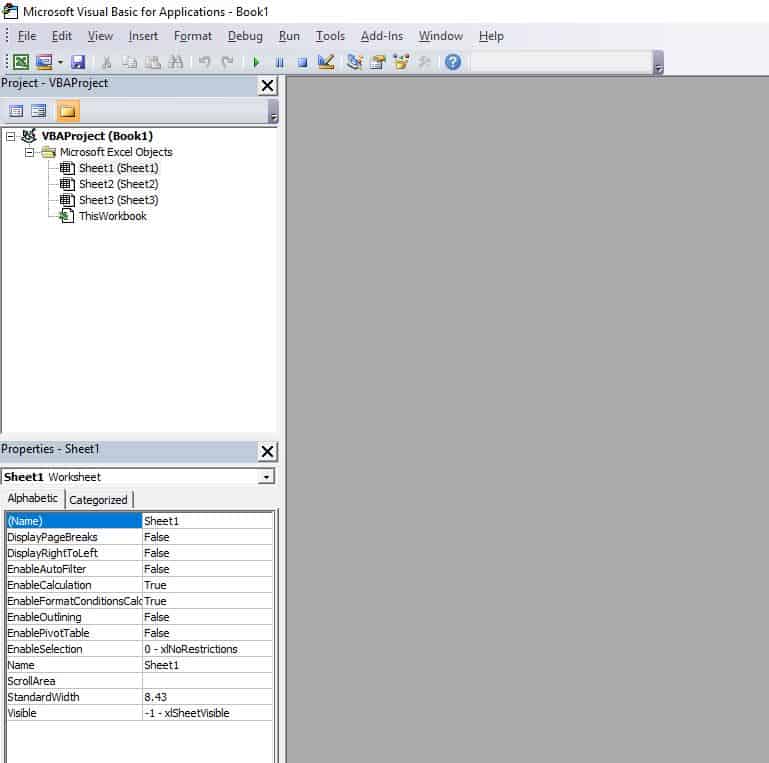
At the top are various menu options, just as there are in the Excel application itself. We’ll discuss some of these in more detail shortly.
In the top left is the Project window. This displays the active VBA projects.
Below this is the Properties window. This displays the properties of the selected object.
The large grey area is where the actual coding process will take place – once we have added a module.
2.1 Write your first routine
Let’s start to become more familiar with the VBE.
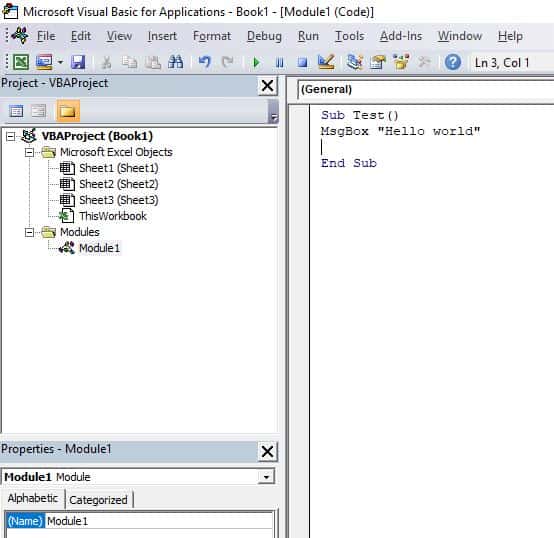
From the Insert menu choose Module. You will notice that the large grey area has now become a large white area that you can type in. This is called the Code window. If you look in the Project window you will see that there is now a Modules folder that contains a module called Module1.
In the Code window type ‘sub’ followed by a space and then
Did you notice what the VBE has done? It replaced the lowercase letter ‘s’ in sub with a capital ‘S’, it added parentheses after the name that we used and it added the line ‘End Sub’ below our typed line.
The VBE will always
The parentheses are where we can add arguments, if required, to be used within the routine. We’ll return to this another time.
OK, lets complete our first routine.
We’re going to produce a little Messagebox to display some text of our choosing. Between the two lines of code type “
At this
You should now have something like the code shown below.
Well done. You’ve just written your first macro. Alright, it isn’t going to win you a job as a software consultant but it’s the first step in your learning process.
Right, well the routine isn’t actually doing anything yet is it? That’s because we need to run the macro in order to execute the code within it. As a programmer you have three choices here :
- Press the Play button on the Standard menu bar.
- Select Run Sub/Userform from the Run menu.
- Press the F5 key.
(When you want your routines to be used by others you will want to create simpler interfaces, for example, a button to press or a menu item to select.)
You should have seen a Messagebox like this:

If the flashing cursor wasn’t within the routine when you selected Run then instead you will have been presented with a dialogue box containing the name of your macro (we haven’t written any others to choose from at this time) and some option buttons on the right-hand side. Simply choose the Run button.
Dismiss the Messagebox by clicking on the OK button.
Let’s return now to using the VBE.
2.2 Examining the Project Window
The Project window is basically like a mini Windows Explorer.
The
Within the project, you will find a folder called Microsoft Excel Objects and this will contain at least one sheet object (all Excel workbooks must have at least one sheet) and the ThisWorkbook object.
These represent the physical structure of the workbook itself and you will see later that there are special sections of code that may be placed in these objects. Additionally, you may find one or more of the following folders; Modules, Userforms, and Class Modules.
2.3 Examining the Properties Window
If you select the project, in the Project window, you will notice that its name is displayed in the Properties window below. Select the part that says ‘VBAProject’ and give the project a more meaningful name, to ease the identification of your project.
Within the project window, open the Microsoft Excel Objects folder and select Sheet1(Sheet1) – the first name is the VBA CodeName for the sheet and the second is the worksheet tab name that can be seen in Excel.
You will see various properties of the sheet displayed in the Properties window. For example, you have the opportunity to change the ‘Visible’ property to Hidden (or even Very Hidden).
2.4 Writing in the Code Window
You will probably have noticed two drop-down boxes at the top of the Code window. The one on the left is the Object list box and the one on the right is the Procedure list box.
You will probably have noticed two drop-down boxes at the top of the Code window. The one on the left is the Object list box and the one on the right is the Procedure list box.
When we have a sheet or the ThisWorkbook object selected (by double-clicking or by right-clicking and selecting ‘View Code’) then the Object list box will let us choose between (General) and Worksheet.
Normally, we would write our general code within a module rather than within an object window. From the list box select ‘Worksheet’. This selection now enables us to choose from various worksheet event routines in the Procedure list box (see Fig5).

Both the ThisWorkbook object and the sheet objects have various events that can house our code.
As the name implies, event code is triggered by a certain event taking place. For example, we can create code that is automatically executed when a workbook is opened. We will return to event programming at a later date.
2.5 Using Protection
There may be times when you want to keep prying eyes from either looking at or amending your code. To do this follow these steps:
- Select your project in the Project window.
- Right-click on the project and choose the Properties option.
- In the dialog box that appears select the Protection tab.
- Place a tick in the ‘Lock project for viewing’ box.
- Enter (and then confirm) your password in the boxes shown.

Click OK.
Save your workbook and close it.
The next time that the workbook is opened it will be necessary to enter a password to gain access to the project.
2.6 Help!
One of the most overlooked sources of help
Some people believe themselves to be above looking in the VBE Help files when they get stuck – do not be one of these people! The built-in help has a great deal to offer and continues to be a useful source of reference even once you become more experienced.
You will see the Help menu at the far right of the main menu in the VBE.
Once you feel ready for some more technical reading you can also visit Microsoft’s own Excel VBA reference.
3 The Macro Recorder is your friend
This is the favourite saying of a friend of mine. And she’s right – it is an invaluable tool in the VBA learning process (and continues to be a useful reference thereafter).
Let’s see how it works.
From the Developer menu in Excel select Record Macro. (In older versions of Excel, from the Tools menu in Excel select Macro and then the option ‘Record New Macro’). You will be presented with a dialogue box enabling you to specify the macro’s name, shortcut key, workbook location, and description. Just click on the OK button for now.
Enter some text into cell A1 and press Return, then make it bold and change the font style and size.
When you have finished recording just press the Stop Recording button (which will have taken the place of the Record Macro button. (In older versions of Excel a small toolbar is now displayed (see picture below) with the Stop button, the square button on the left, for the recorder.)

Now go to the VBE and examine the code that the recorder has produced.
It will look something like this.

This is Excel’s interpretation of what we did. Let’s test it out. Select cell E15 in Excel and then run the
Well, the text has been added to E15 but the formatting has been applied to A1, which has also been selected.
This is because the recorded macro refers to the ActiveCell when it adds the text and when we ran the macro the ActiveCell was E15 and not A1. However, the formatting is applied to A1 because that cell is selected and then the formatting is applied to the Selection.
Whilst the recorder is an excellent source of reference, you will often find that the code that it produces can be amended a little to better suit your needs.
Let’s modify our recorded routine.
When working with VBA it is very rarely necessary to either Select or Activate objects in order to work with them – and your code will be more efficient if you keep this in mind. See the figure below for an example of how Select may be removed from your code.
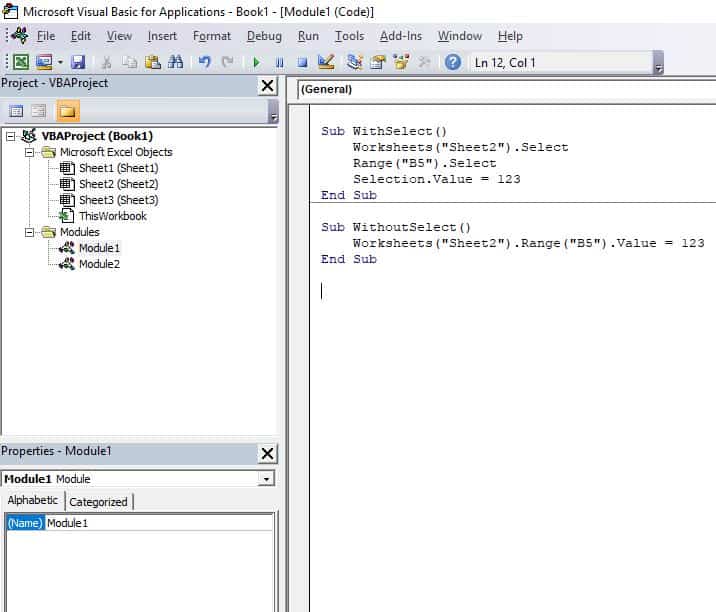
We also want to perform a series of actions on one object so, rather than make repeated references to it, we will use the With … End With statement.
Like this:
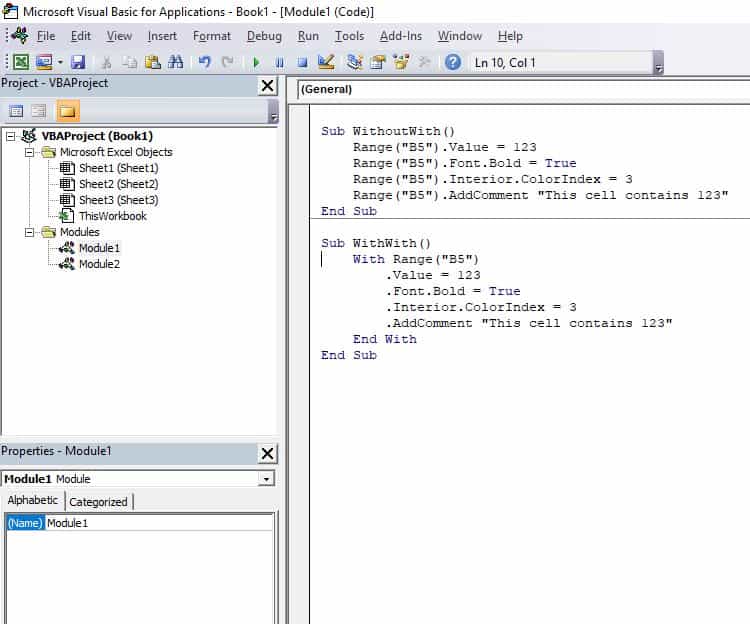
So in our example, rather than select cell A1 and then work with it we simply work directly with the cell and make use of the With statement.
Our amended code becomes:

There are two further points to note about the amended code.
Firstly, it is possible to nest statements – that is to include one statement within another.
In the example above we have nested one With statement ( With .Font ) within another ( With Range(“A1”) ).
Secondly, much of the code to do with the Font properties has been removed.
This is because the Recorder included default values for Properties that we did not amend ( as we are not amending them it is not necessary for them to be included ) and because it records all of those Properties for each change that we make ( we changed both the Name and Size of the font and so we ended up with two sections of code that were identical apart from those particular Properties ).
Before moving on there are two final points I want to make regarding the Macro Recorder – the Relative Reference button and the case of the missing toolbar.
First Point – The Relative Reference button is also found in the Developer menu item, immediately next to the Record Macro option. It enables us to choose whether our recorded macros will make use of Relative or Absolute references.
Select cell A10. Now activate the Macro Recorder and select cell A5. Stop the Recorder. If you look in the VBE you will see that you have generated code that looks like this:
Now repeat the same process but this time, before you select A5, click on the Relative Reference button. The code this time will look like this:
The different reference
You will have found that the first routine generated an error message like the one shown below (just click the End button to dismiss the warning).
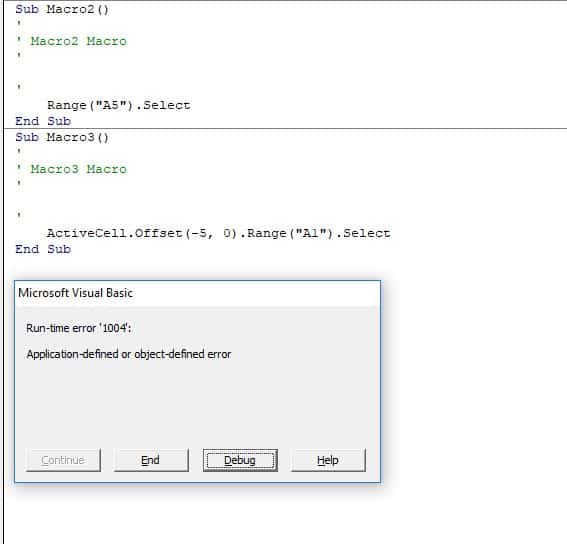
The reason that the error message was generated is that the code was trying to select a cell 5 rows above B5 – there
Second Point – I once lost the ‘Stop Recording’ toolbar! Should you face the same situation here is what you need to know.
This only applies to older versions of Excel – if you are accessing the recorder through the Developer menu item you will be fine, if not then take note of the following paragraphs. The loss of the toolbar is caused by clicking the Close button (the ‘X’) on the toolbar before the recording process has finished.
You can still stop the recording process by going to the Macros option in the Tools menu in Excel – here you will see a Stop Recording option.
To recover the lost toolbar select Customise from the Tools menu. Then on the Toolbars tab place a tick next to the Stop Recording item and click on the Close button. The toolbar will now have reappeared.
OK, that’s it for the Macro Recorder section.
4 That’s all folks!
Next time we’ll have a look at some simple Excel VBA programming concepts.
5 Frequently Asked Questions
To round things off, here are few frequently asked questions.
What is a Macro in Excel?
Excel allows us to use Visual Basic for Applications (VBA). This is a simple programming language. Using VBA we can create our own chunks of executable code – these chunks are referred to as macros.
We use macros to either achieve results that cannot be achieved with Excel alone or to automate tasks that we routinely undertake in Excel.
What is VBA in Excel?
The acronym VBA stands for Visual Basic for Applications.
It is a programming language that we can use to perform tasks in Excel (and other Office applications). The routines, often referred to as macros, that are produced enable tasks that would take hours to perform manually to be performed in minutes.
Should I Learn VBA?
As with many such questions, it depends …
Do you undertake tasks with Excel which are quite repetitive and time-consuming? If you do, then the investment of time in learning some basic VBA may be repaid many times over by the potential time savings that you could enjoy by automating those tasks.
Is VBA Hard to Learn?
It’s probably not as hard as you might imagine. Certainly not as difficult as some other programming languages.
The basics can be learned very quickly. It is then just a matter of practice until you become more proficient. One of the best ways to learn is to join one of the popular Excel online forums and try to answer the VBA questions posed by others.
6 The End

I hope that you’ve enjoyed this post.
Feel free to navigate around the site to see if there is anything else that may be of interest to you.
If you liked this post please share it. Thank you 🙂
If you’d like a heads-up when the next post is issued sign-up to the Richie’s Room Newsletter.
And, if you’d like to add a comment that would be great too – you can do that below.
Hi Richie
I stumbled on this and by a strange coincidence, I decided to get serious about improving my Excel skills and in particular creating macros and using VBE. I worked through all the examples here and it all makes sense. Excellent stuff!
Thanks and I hope there is more
Best regards
Andy
Hi Andy. Thanks very much for your comment and I’m glad that you found the post to be useful. I will be doing more VBA posts – it’s just a matter of finding the time!